By Lauren Buonaugurio, House of the Temple Intern
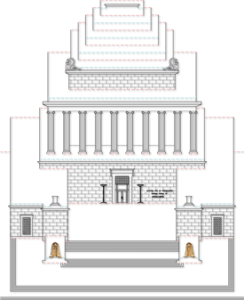
Right: Template #1 for building the exterior of the House of the Temple pop-up.
While working as an intern at the House of the Temple, I saw a vast collection of beautiful Masonic and historical artifacts every day. However, the true beauty of the Temple lies in the architecture of the building itself. One day, while in the office of Dr. S. Brent Morris, 33°, Managing Editor of The Scottish Rite Journal, I saw an example of the “pop-up Lodge” created by Bro. Guy Spivey. He wrote an article in the September-October 2008 Scottish Rite Journal with directions and template for building the Lodge. When I saw the pop-up, I was immediately interested and asked Dr. Morris about the artist who created it and discovered that he also created a pop-up House of the Temple.
Dr. Morris asked me construct a pop-up from Bro. Spivey’s template and to write directions for making it. You can find the templates for the House of the Temple and the original Lodge on the Freemason Network at www.freemasonnetwork.org/popuplodge. Here’s how you can build one:
TOOLS
- Fine tip razor knife (X-Acto)
- Cutting board
- Ruler or straight edge
- Stylus to make the folding easier (I used a nail file)
- Card stock paper (I used 60#)
- Glue stick
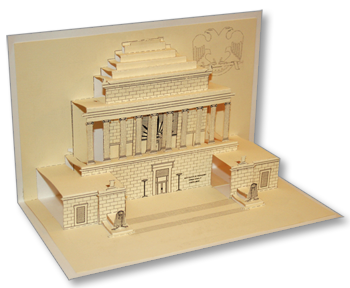
Left: Completed pop-up House of the Temple (Photo: Jeri E. Walker, Scottish Rite Journal)
This is a complex model that requires time, patience, and perseverance—take it easy, don’t rush, and enjoy the challenge.
- Go to the Freemason Network, www.freemasonnetwork.org/popuplodge, and print out the House of the Temple pop-up templates onto the card stock paper. There are two separate templates, a smaller interior section and a larger exterior one; make sure to print them on separate pages. The card stock needs to be rigid enough to support the architectural elements, but thin enough to cut and fold (the example here was printed on 60 lb. paper).
- Place the printed card stock on the cutting board and begin with the interior section as it is easier and will allow you to get familiar with the pattern.
- Cut along the outer black lines, using the straight edge and razor knife to trim away excess paper. Next, cut along the interior heavy black lines.
- Use the stylus to score the valley fold lines (red, dashed lines) and fold the paper, using the nail file to create a stiff crease. For mountain folds, place the nail file edge along the blue, dashed lines on the back of the paper. Working from top to bottom of the page, repeat these steps until all folds are complete.
- After the interior piece is completed, set it aside. Place the main template on the cutting board and begin cutting along bold black lines. Begin with the smaller details to ensure that they are more accurately cut (double-headed eagles, column capitals, urns, and sphinxes). You will need to do these freehanded.
- Next, cut along the straight bold lines, using the straight edge to guide the knife. Once all of the cutting is done, double check that the cuts are complete, and discard the card stock between the pillars on the exterior sheet.
- Now the process of folding the card can begin. Do not rush! Begin this folding with the least detailed lines, using the same technique as with the interior section. The roofline will be the trickiest area, so take your time with it; work from the largest folds to the smallest.
- Once all of the folds are complete, fold the exterior piece completely in half ensuring that the top and the bottom meet.
- Make a cover for the pop-up House of the temple using a piece of very heavy card stock (the cover of the example shown was made from a manila folder). Place the two finished template pieces together inside the folder, centered. Remove the outer piece, making sure to leave the interior section centered. Using the glue stick, glue the interior section onto the center of the cover. Then glue the exterior section onto the folder, making sure that it is centered over the interior section.
- Fold the card in half and set a book on top, until dry.
(This is a great gift for officers, especially if signed by fellow Lodge members!).


